 | |
| AVR Programmer |
About AVR Programmer
This simple AVR Programmer will allow you to transfer hex programs to most ATMEL AVR microcontrollers without sacrificing your budget and time. It is more reliable than most other simple AVR programmers available out there and can be built in very short amount of time.
AVR programmer consists of in-circuit serial programmer (dongle) and small pcb with a DIP socket that you can fit your microcontroller and program it quickly.
You may also use this programmer as a stand alone in-circuit serial programmer that can be used to conveniently program AVR microcontrollers without removing them from the target circuit.
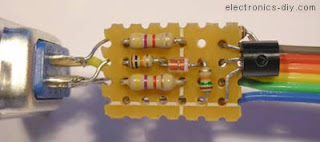
Entire AVR programmer has been build with using common parts and fits in the case of the serial connector. The socket pcb has been created to fit a 28-DIP AVR ATmega8 microcontroller, but you can build a socket pcb for any other AVR microcontroller out there. This AVR programmer is compatible with a popular PonyProg software that shows you a status bar of the programming progress.
AVR In-Circuit Serial Programmer
 |
| AVR Programmer's PCB (front) with 9-PIN female RS232 serial connector. |
 |
| AVR Programmer's PCB (back) |
 |
| Fitting AVR Programmer's PCB in RS232 serial case. |
 |
| Finished AVR Programmer with standard 6-PIN ICSP connector. |
AVR Socket PCB
Socket PCB has very minimal number of components and is used for programming your desired AVR microcontroller outside of your target circuit.
 |
| Socket PCB with 28-DIP AVR ATmega8 microcontroller. |
 |
| There are two connections; ICSP that connects to AVR Programmer, and external +5V supply. |
Supplying microcontroller with external +5V voltage as opposed to taking it directly from computer's serial connection port ensures that the chip is receiving exactly +5V voltage and provides very reliable error free programming.
 |
| Socket PCB for 28-DIP AVR ATmega8 microcontroller. |
+5V voltage supply for AVR chip may be provided from external power supply or even better - directly from USB connection.
PonyProg
To be able to send hex file from your computer to AVR microcontroller you will need to download and install PonyProg2000. After the installation, the first thing you will need to do is configure PonyProg to work with our AVR Programmer. To do this go to "Setup" menu and select "Interface Setup". The following window will be shown and highlighted areas show you exactly which options should be selected.
In the next step select "AVR micro" and your microcontroller type that you will be programming (ex. ATmega8).
At this point PonyProg configuration is complete and we can open hex program with which AVR microcontroller will be flashed. Go to "File" menu, select "Open Program (FLASH) File ...", and point to the hex file to open it up. You should see hex numbers as shown on the screen below. If you haven't connected AVR Programmer dongle to your computer's serial port yet, then now is the time. Make sure that AVR Programmer is physically connected to your AVR microcontroller through Socket PCB or through ICSP 6-PIN connector. Finally click on the highlighted icon "Write Program Memory (FLASH)", or go to "Command" menu and select "Write Program (FLASH)".
Click on "Yes" button to confirm the programming.
Now sit tight, relax and watch the programming progress on the status bar. PonyProg will program AVR microcontroller and verify if the hex file was transferred without any errors. For your information this process shouldn't really take more than 10 to 30 seconds. This depends on the size of the program that you're trying to flash.
After programming is completed "Write successful" window will be shown letting you know that AVR microcontroller has been programmed, and is now ready to be used.
adopted from: electronics-diy.com


No comments:
Post a Comment